Error-Ref.com

You are here: Home / Search for "Doubled die"

Search Results for: Doubled die

Overdate / Repunching or Re-engraving the Date

PART II. Die Varieties:

Overdates 

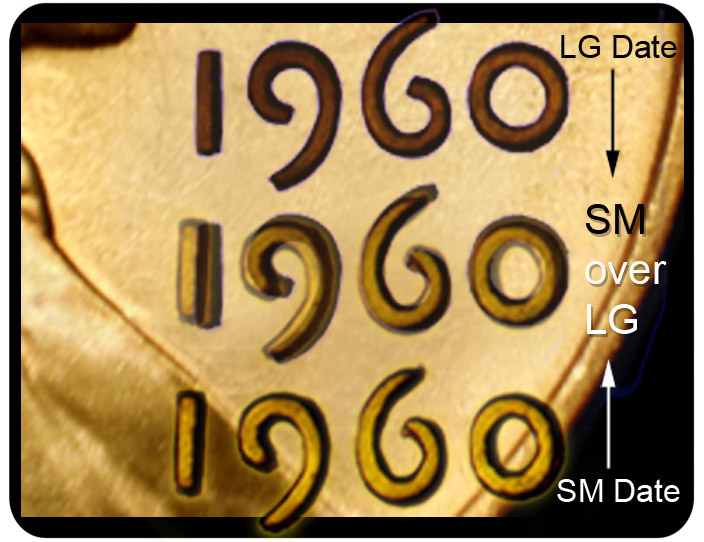
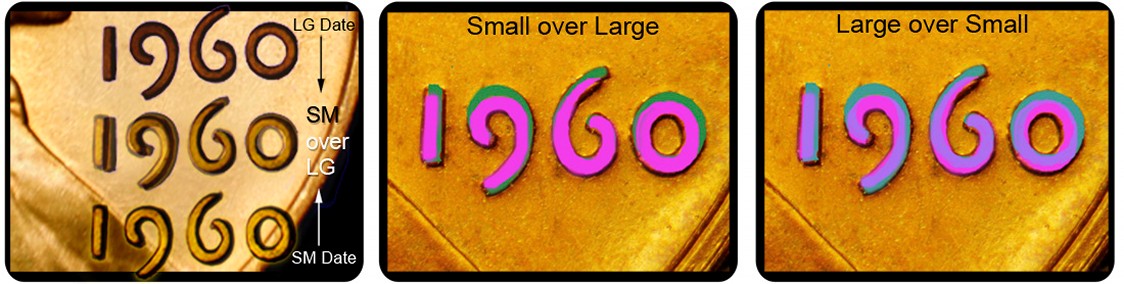
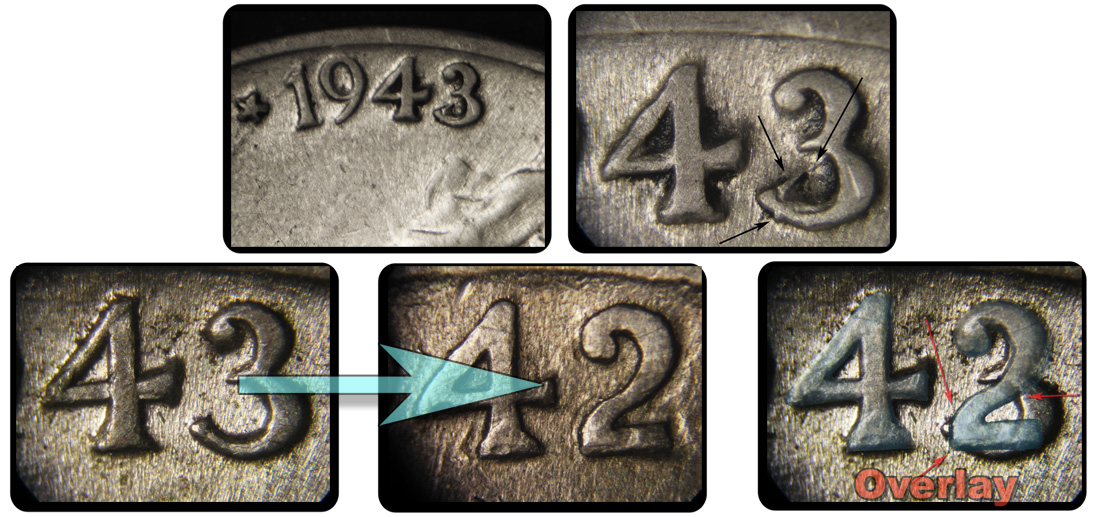
Definition:  An overdate is a modification made to a working hub that involves two different numerals being punched or engraved into the same spot.  One or more digits may be affected.  Overdates sometimes represent an attempt to correct a mistake when the wrong punch was initially used to punch in a digit. At other times it represents an expedient measure.  Dies left over from the previous year may simply have one or several digits repunched so that the die can be used in the current year.  The relevant area of the die face is often abraded so that the prominence of the original date is reduced.

Overdates are closely related to re-punched dates.  However, a re-punched date doesn’t involve the superimposition of one digit over a different digit.  Repunched dates simply involve the repunching of the same digit or digits.

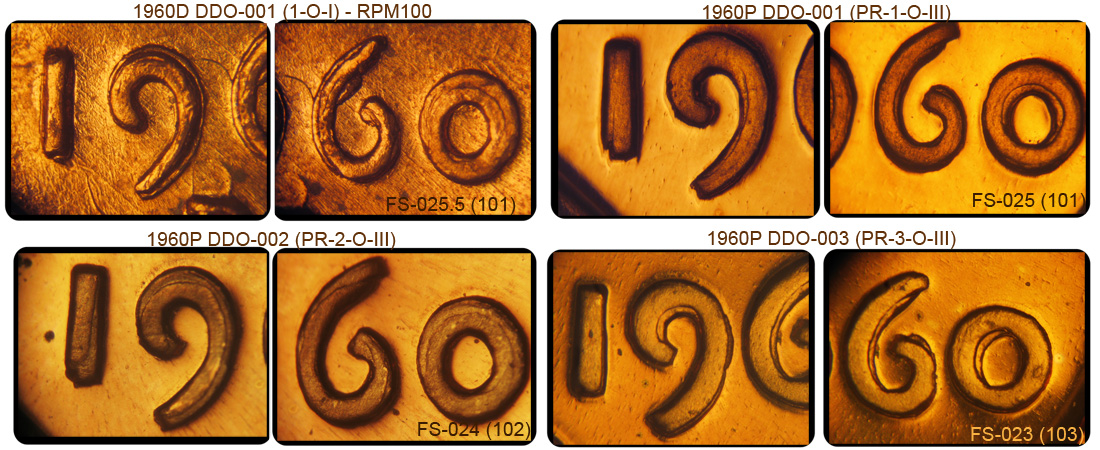
Overdates should not be confused with Class III doubled dies (design hub doubling).  Although the outcome looks similar, the nature of the variety is entirely different.

Overdates ceased being a possibility for U.S. coins in 1909 when the mint began placing an engraved date on the master die.

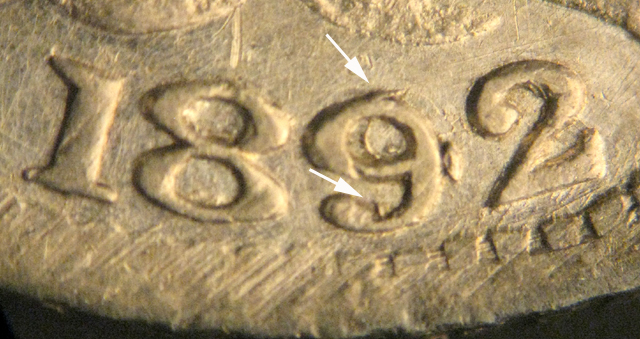
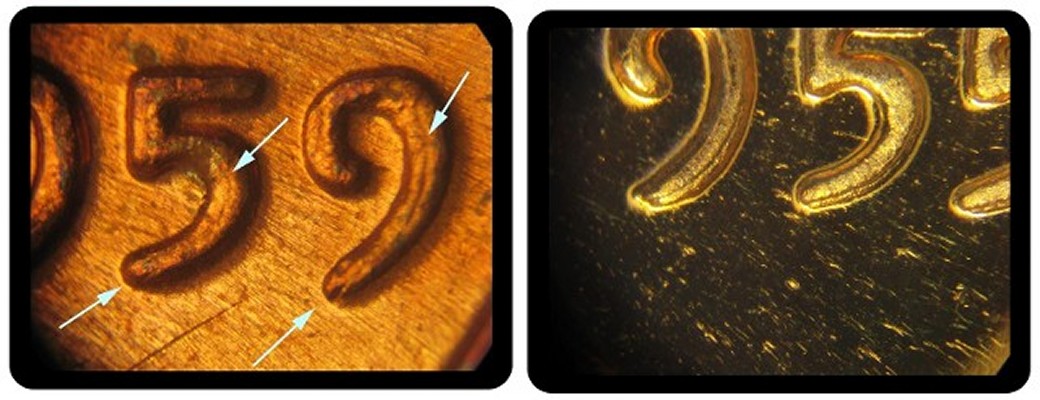
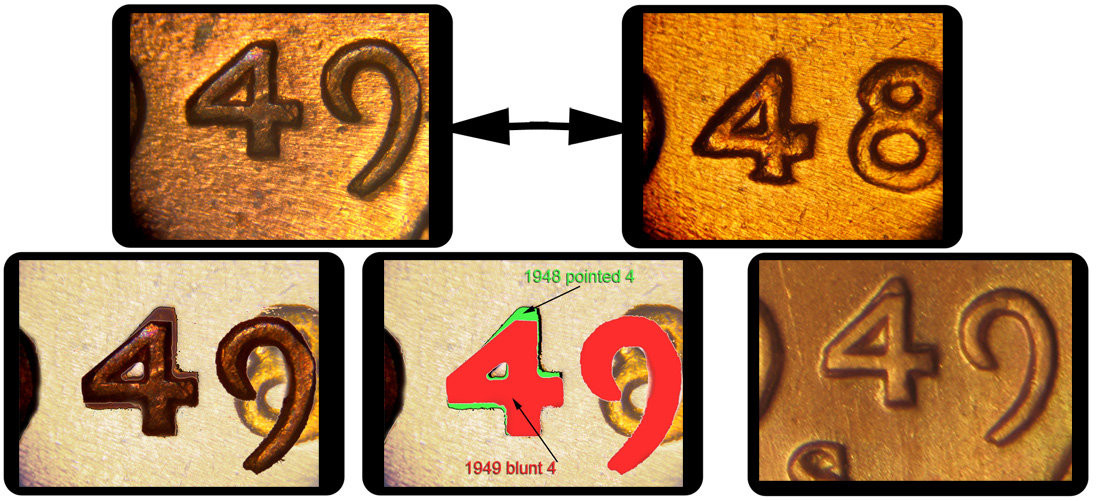
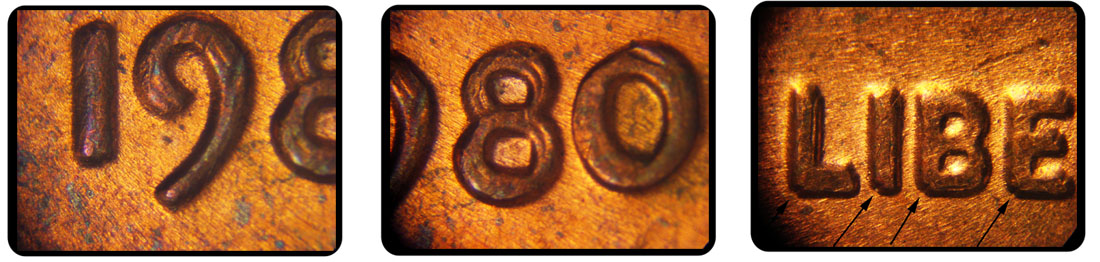
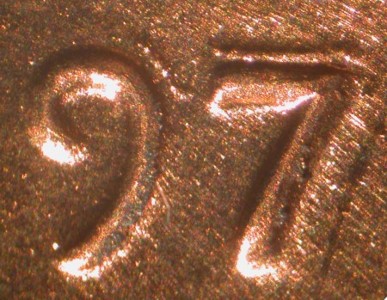
The image below shows an 1892 Peruvian 1/2 dino, with a repunched 9 over an underlying 8.


Centrally Located Doubling

PART II. Die Varieties:

Doubled Die:

Single Squeeze Hubbing:

Centrally-located doubling


Definition:  The majority of centrally-located doubled dies are generated by the single-squeeze method of hubbing. During the single- squeeze process, two mishaps may occur.  Sometimes a slightly tilted hub (or die) will settle spasmodically, causing a “skip” that will generate a secondary image.  At other times a technician will interrupt a hubbing in its early stages in order to re-position the hub or the die.  When the hubbing is restarted, this

may result in offset impressions.  This is not inevitable, however, as the second hubbing may obliterate the impression left by the first hubbing.

The following images (top left and right) depict some centrally-located doubled dies seen on the 2009(FY) Lincoln cent reverse die.

The image located above left shows a doubled ear lobe on a 2008 Alaska statehood quarter. The image to the right is a bit more unusual; this doubled die is found on a 2000P Lincoln cent. It shows a faint secondary statue of Lincoln located beneath and rotated 180° relative to the regular statue. The images are courtesy of John Wexler.

Class I

Part II. Die Varieties:

Doubled Dies:

Class I (Rotated Hub Doubling):

This class of doubled die is probably the easiest to conceptualize and diagnose.  It emerges from two separate hubbings.  Prior to the second hubbing, the working hub or the working die rotates around its vertical axis (the axis that passes though the center of the hub/die face). Class I doubled dies are listed as showing a clockwise (CW) or counter-clockwise (CCW) rotation.  The direction is determined by which hubbing is clearest and most complete. This is usually the second hubbing (which tends to be deepest).  Exceptions do exist, however.

Doubling typically has a rounded appearance.  When the hubbing impressions are extremely close, the doubled die may only be recognizable from notched serifs and corners, subtle separation lines, or extra thickness.

Below is an overlay diagram of a fictitious Class I doubled die that has a clockwise rotation similar to the King of Doubled Dies, the 1955P DDO-001. Notice how the spread is equal on all devices and increases the farther out you go from the center of the coin.  DDO refers to a doubled die that affects the obverse face of a coin.  DDR refers to a doubled die that affects the reverse face of a coin.

Below are photos of 1972P DDO-001, a Class I DDO with a strong CW spread on all outlying devices and parts of the jacket. A second hubbing typically eliminates interior parts of the design produced by the first hubbing. Therefore doubling is often only detectable in areas bordering the field. Here, only the outside elements of the portrait of Lincoln and the motto show doubling while the centrally-located details are lost to the second hubbing.

Hubbings are ordered from lightest to deepest, either CW or CCW. On the G of GOD you can see that the heavier of the duplicate letters (G-2) is located to the right (clockwise) of the lighter letter (G-1).  It is likely that the heavier letter represents the second hubbing, but this cannot be proven.

Below you can see clear separation between the letters of TRUST. On the first few digits of the date, where design elements are more closely bunched (due to being closer to the center of the design), distinct notching can be seen at the upper and lower corners of numeral 1.

Below is a Class I doubled die on the reverse face of a 1964 cent ( 1964P DDR-001).  It shows a counterclockwise (CCW) spread. Again there is clear separation, notching, and rounded doubling. The doubling is strongest in “STATES oF” due to the axis of rotation being located slightly south of center.

The next example is a DDR on a 1979 Israeli 25 agorot. The spread, best seen in the Hebrew letters located near k12, is elsewhere indicated by notches and subtle separation lines. As would be expected of any Class I doubled die, the doubling is weakest toward the center and strongest toward the perimeter of the coin.

Notching of corners and serifs reflects the presence of closely-spaced letters and numbers.  Often there is a difference in height as well between the closely overlapping design elements. Below is a 1934-D quarter listed as DDO-001 that shows very obvious stepped notching in IN GOD WE TRUST. Subtle doubling, also in the form of notching, is evident on all the peripheral design elements. Detailed photos presented below depict notching in the E of LIBERTY, as well as the 3 of the date.

NOTCHES EXPLAINED:
If a die shows hub doubling and there is a rotational shift, the notches will be more apparent. The following illustrations show a hypothetical CCW rotation with Red being the first hubbing and Green the second. The green letters are also slightly south (or down) in relation to the red. While the spread is minor, the notches are obvious. Rounded portions of letters (like the o and S) show the development of a secondary, offset ellipse.

Now we will see a stronger CCW spread where there is very little degree of offset between the hubbings. The result is fewer notches overall, but where the design drops off, such as the serifs on the S or the top of the A, there will be
minor notching or splits. Below are some notching diagrams that will give you an idea of where  Class I (and also Class V) hub doubling can produce notches.

Below are examples of Class I Doubled Dies on various Lincoln cents. 1941 DDO-001

1941 DDO-002

1936 DDO-001

1971 DDO-002

On to CLASS II

All doubled die illustrations are by Jason Cuvelier


Class II

Part II. Die Varieties:

Doubled Dies:

Class II

The next class, Class II, is harder to find empirical evidence to conclusively prove the cause of the Hub Doubling. Most often hypothesized as a misalignment event relating to either the Die or the Hub, which has expanded or contracted too much in relation to the first hubbing during the annealing or tempering processes.

Class II is characterized by having a spread along the outside devices from deepest to lightest hubbings, which goes toward the Center (C) or towards the Edge (E).

Dies are annealed (cooled slowly) to make them softer so they are more susceptible to taking an impression of the Hub. The Hub in contrast is tempered, quickly cooled, so that it is more durable and does not distort while transferring an image to the Die. If for whatever reason, either the Die or the Hub were not to return to its normal size in between hubbings, doubling could result like the illustration below of a fictitious 1960 Lincoln cent where doubling would be more pronounced toward the rims.


Let’s clarify the direction of the spread. Here we have 1971P DDO-001 (1-O-II-E); the design elements inside (closer to the center) have a lighter hubbing, and may very well have been hubbed first, meanwhile the design elements nearest the rim are deeper and might have been hubbed second.

One critical point is the order (or direction) of the hubbings. The order is indicated as llightest to deepest, this determines the direction. In the above and below examples, (1.) is closer to the the center and is lightest, while (2.) is deeper and near the edge. Doubling is not always consistent and is hard to explain why as evidenced by the light northerly spread on the date seen below.
The inverse direction is shown below: 1985P DDO-001 (1-O-II-C) which shows the outer impression, closer to the edge, being hubbed lighter (indicated as 1.), while the inner impression, closer to the center, and was hubbed more deeply (indicated as 2.).
Below the closeup of the date on 1985 DDO-001. The illustration to the right, shows two hypothetical hubbings spread toward the center (C) on a fictitious 1985-D cent. The lighter impression, is outer, and indicated in red. The inside deeper impression is indicated in green.
1985 DDO-001 (1-O-II) above, and 1984D DDO-001 (1-O-II) below, both show, to a degree, how far into the design Class II doubling can be present in that the upper regions of the hair and the lower bust. Both areas clearly showing doubling. And where are the rest of the doubled devices? As with Class I and V, the doubling is more pronounced on the outer edges. The inner design elements would have both been barely doubled and the second hubbing would have likely obliterated what little may have shown.
Is it the Hub or the Die which did not return to its original diameter in between hubbings? Being that Class II DDOs tend to be unique compared to other listed doubled dies for that date, it is likely the Die in most circumstances.
Our next example is 1964P DDR-020 (20-R-II-C) (coin courtesy Chris Welch); which as the designation states, is spread toward the center. However, in this case there is another level of distortion in that that lighter (outer) impression is oddly narrower. This is almost opposite of the situation with a related class of Hub Doubling (Class VI, Distended Hub Doubling) which is characterized by an increase in thickness toward outside devices.

There is a large number of other Class II DDRs on the Lincoln cent from 1962 through 1964.

Here we can see a Jefferson nickel listed as 1962P DDR-015 (15-R-II-C) with a medium spread on the reverse that is visible on most devices. The doubling is more pronounced near the rim and gradually decreases as we navigate toward the center. Notice how light the spread becomes on FIVE and the beginning of MONTICELLO.

Not to be forgotten are the notches. Both the Jefferson above and the Roosevelt 1964 DDO-001 (1-O-II) below, show nice notches at the serifs. 1964 DDO-001 also exhibits a doubled forehead, hair and LIBERTY, but shows very little on the date.
Here is a complete look at 1971S DDO-001 (PR 1-O-II C) 1DO-001 with its very strong spread in LIBERTY.
And finally the date view of 1959 DDO-001 (1-O-II) and 1955 DDO-004 (pr 4-O-II), both showing a Class II spread on the date.

On to CLASS III

All doubled die illustrations are by Jason Cuvelier


Class III

Part II. Die Varieties:

Doubled Dies:

Class III (Design Hub Doubling)

Likely the easiest Doubled Die to explain yet the least common to have occurred. Class III Doubled Dies occur when after the first hubbing with one design another hubbing follows of a different design or a slightly altered design.

Below is an overlay diagram of a fictitious Class III Doubled Die that is similar to several Doubled Dies that occurred during 1960 when the Mint used two different Master Dies, the first bearing a small date, then another made later that year, bearing a larger date. You can see clear doubling in the date and then slight doubling in LIBERTY.

Doubling is sometimes the least dramatic characteristic observed, as in some cases with other denominations, such as on a Mercury Dime with a 1942 over a 194. Designated as 1942P DDO-001 (FS-10.7 [101] when, for whatever reason, a die after having been hubbed with a 1941 hub, was hubbed a second time with a hub having a 1942. There is some doubling in IGWT, but there is a very dramatic, naked eye obvious, overdate. It is important to note that all overdates after 1907 are Doubled Dies whereas previous overdates had dates punched into the die one on top
of the other.

Collectors of Lincoln cents should have an easy time understanding what would happen if a 1960 small date hub and a 1960 large date hub were both used to create a die. There are four cases of this happening, three on proofs and one business strike from Denver (which also has a nice RPM). Below is an approximation overlay of a small date over a large date with an example designated as 1960P DDO-002 (FS-102). The doubling is very obvious in the date, LIBERTY and parts of IGWT. At the bottom the small date is lavender while the large is green; the first shows a small over a large and the second shows a large over a small. They almost line up perfectly with DDO-002.

The 1960 Denver version is just as dramatic in the date but less so in LIBERTY. The small date almost looks as if it were placed on top of the large date. Listed as 1960D DDO-001 & RPM-100 and is illustrated below. John Wexler states (The Cherrypicker’s Guide to Rare Die Varieties, 4th edition, volume one, 2001) that in the “early days” any Doubled Die that “…did not fit the parameters of any of the other classes of doubling” were often erroneously designated as a Class III Doubled Die. Wexler also says that “[he] will not assign a Class III designation to a variety unless [he] has documented evidence that different designs were in use [that] year….”

Another curious set of examples comes from 1949 when, for reasons unknown, three dies were hubbed with a pointed topped 4 hub and then hubbed again with a blunt topped 4. They are listed as 1949S DDO-001, 002 &003 by CONECA. It has been hypothesized that the pointed hub is that from 1948 which was absent an 8 digit (or the 8 was removed). Below is DDO-002 and then an approximation overlay showing a pointed 4 (red) from 1948 undera blunt 4 (green) from 1949. They match up convincingly and suggest the likeliest, but not necessarily the only possible explanation. As a suggested reason for this (BJ Neff) proposed the possibility that the Mint was short on hubs and quickly altered an extra 1948. What isn’t answerable is why only three were hubbed once using this particular hub.

Next is an overdate Jefferson nickel, listed by CONECA as DDO-003 (3-O-II-C+III+V-CW) and in the CPG as FS-05-1943P-101 (28). Here we have a situation where a lighter hubbing of a ‘42 is partly concealed by a deeper hubbing of a ‘43. To clarify, below is a 1943 Jefferson overlaid with a 1942; the diagonal line matches part of the primary curve of the 2, while the little protruding point below the curve of the 3, matches the corner of the bottom of the 2.

Finally, a comparison illustration of the four known 1960 P & D Class III doubled dies.

On to CLASS IV

All doubled die illustrations are by Jason Cuvelier

Class IV

Part II. Die Varieties:

Doubled Dies: 

Class IV (Offset Hub Doubling)

This class of Doubled Die is produced when two hubbings have their centers misaligned. It is characterized as having doubling that is evenly spread in one direction. The doubling is unlike that found on Classes I or V, where the misalignment-event shows a rotation at or near the center (I) or at or near the rim (V). Doubling is often rounded, found closer to the center, and when identified on numeric or alphabetic characters, shows notching.

It has been hypothesized that the reason many examples do not show doubling near the rim is because one of the hubbings only received an uncharacteristically incomplete hubbing. Such an incomplete hubbing would result in design elements not being pressed deep enough in the middle of the die, and not at all along the perimeters. The die originates in a conical shape until it is completely pressed down, if the incomplete hubbing was the first, the outer devices may not have been hubbed the first time around.

Below is a facsimile of a fictitious 1960P with a strongly doubled Class IV DDO. In this case the first hubbing would have been centered and complete, with the second hubbing having its center oriented N-NE from the first. It should be noted that this example is showing universal doubling on all design elements (including the whole portrait) which has never been documented but shown for effect.

Below is 1983 DDR-001, which exhibits a large spread going North, it is stronger than the above hypothetical illustration. The ’83 DDR shows strong peripheral doubling. The central elements show some doubling around the parameter of the memorial and in a few sections of the building itself (like the upper portions of the columns). Notice the notching (a clear indication of hub doubling), rounded secondary images and how the deeper hubbing shifts consistently in one direction from the lighter hubbing.

Below is a colored overlay demonstrating that the ’83 DDR has a wide northerly shift between the hubbings. Green is the lighter hubbing followed by red, which is the deepest.
Below are details of 1983 DDR-001
Another bold example, yet displaying only an incomplete hubbing, is 1984 DDO-001. It displays a widely doubled ear, beard details, back of head and bow tie.
1984 DDO-001 also appears to be ever so slightly pivoted as the second piece of the bow-tie resides further away proportionally than the second ear. Analysis suggests the center of rotation would be off at least a centimeter to the side of the die past IN of IGWT. An overlay and details are below.
Notches: As has been pointed out by most variety specialists and attributers: notching, even though the doubled areas are shallow, is always, to a degree, present. MD will seemingly smear the doubled area away from the device impacted but it will not leave notches, how could MD leave notches? …Think about it while viewing a fictitious notching diagram of Class IV doubling going south illustrated below. While the degree of doubling is strong, there would be clear evidence of notching whereas MD would have pushed or flattened metal over the areas that display notching.


1909 DDO-001, the doubled areas indicate a incomplete hubbing. Although hard to identify, RTY has notches, most evident on the SW corners.
1942-S DDO-001. Another incomplete hubbing, doubling is faint, and confined to central elements and the upper motto.
Below is a Jefferson nickel known as 1939 DDR-001. This doubled die displays a strong, yet partial second hubbing, showing on MONTICELLO, FIVE CENTS & the right side of the building. The notching and separation are spectacular.
Our final example is on a 1972 Colombian 20 Centavos. Here we see a nice a northerly spread that shows across the motto, date and parts of the portrait.
Pictures of the Class IV doubled die obverse 1988 DDO-003 (1DO-010) FS-101 which has a strong extra ear south – HERE.

On to CLASS V

All doubled die illustrations are by Jason Cuvelier


Class V

Part II. Die Varieties:

Doubled Dies:

Class V (Pivoted Hub Doubling)

Class V Doubled Dies are related to Class I Doubled Dies as they both have a rotation in the doubling. If one understands Class I, Rotated Hub Doubling, then understanding Pivoted Hub Doubling should be a snap. Where Pivoted hub doubling differs is that the center of rotation is very near or at the rim. (While Rotated hub doubling may not always be dead center, nevertheless, as long as it is in the central area, it is considered Class I whereas anything near the rim is Class V.)

Like Rotated hub doubling, doubling is either Clockwise (CW) or Counter-clockwise (CCW). Unlike Rotated hub doubling, the degree of rotation (or the spread) is strongest opposite the pivot point. Doubling progressively diminishes from there as you move toward the pivot point. Rotated hub doubling, by contrast, shows same degree of rotation all away around.

Below is a facsimile of a fictitious 1960P DDO with Class V doubling. The pivot point is in-between coordinates K5 and K4 near the date. A K(number) represents an area along the rim that coincides with numbers on a clock. Notice how there is no doubling at the date, but directly opposite the pivot point at K10.5, there is very strong doubling. Follow the doubling around and it gradually decreases.


A similar DDO to the illustration above is 1995 DDO-001 (FS-101). It has its pivot point near K4 and shows strong CW doubling in IN GOD and parts of LIBERTY with lesser doubling in WE TRUST.

For clarity, below is another facsimile of a fictitious DDO also with a K4 pivot point like that of the 1995 above. The hubbings are colored green (lightest) and red (deepest). The strongest doubling is seen in LIBERTY and IN, as you move away toward the date doubling decreases.

For comparison a shot of LIBERTY from 1995 DDO-001 is next to an overlay from the above hypothetical. Below are details of 1995 DDO-001.

1936 DDO-003 (FS-103) with a pivot point at K5 shows a strong spread in IN GOD that progressively decreases toward TRUST and cannot be seen in the date.

Next is 1980 DDO-001 (FS-101) with a K11 pivot point showing strong doubling in the date, decreasing in LIBERTY and not at all in the motto.

1966 DDO-001 (FS-101) with pivot point at K7 shows strongest in TRUST and fades but is visible in the date, WE, the eyelid and edge Lincoln’s coat.

1973 DDO-001 has a pivot point around K5. Doubling is seen in LIBE and IN TRUST.

1995-D DDO-003 (FS-101) with a pivot point at K7.5 shows the strongest doubling in TRUST. Doubling diminishes through the rest of the motto and date. Some doubling is visible in the hair, ear, eyelid and mintmark. The mintmark is part of the design (not punched into the die) so this is not an RPM.

On to CLASS VI

All doubled die illustrations are by Jason Cuvelier.

Class VI

Part II. Die Varieties:

Doubled Dies:

Class VI

Class VI: Distended Hub Doubling occurs during hubbing and is related to lateral expansion of the die face.  Expansion is impeded in areas where the raised elements on the face of the working hub interlock with the freshly-penetrated die face. This causes distortion in elements that are relatively near the perimeter of the die face. The affected elements are thickened, and may show sloping, pointed, or twisted regions.

Historically Class VI has been attributed to a worn-out hub that becomes distended from extended use. However, if that were the case we should see an even progression of design distortion and expansion in any year with a Class VI doubled die. In other words, we should encounter specimens in which the affected design elements show slight to marked expansion. This has not been the case. Another problematic association is the tendency for Class VI to be present with Class II (Distorted Hub Doubling). If Class II can be traced to faulty annealing of the die, why would it be found so routinely with Class VI if the two do not share a common cause or even a related cause?

Class VI in all likelihood has the same root cause as Class II – a problem intrinsic to the die steel or one that is caused (or exacerbated) by faulty heat treatment. During annealing the die face experiences excessive expansion, sometimes localized and sometimes over the entire die face. The difference between the two forms of hub doubling is the location and the timing of the expansion. A Class II die (or hub) will expand right after the first hubbing, distorting the perimeter and pushing it beyond the intended circumference. A Class VI by contrast will expand during the first or second hubbing from the heat generated by the hubbing.

In a Class VI doubled die, affected devices are in partly or entirely parallel to the design rim. During the hubbing, the die face experiences lateral expansion, but the hub will not. Any raised part of the hub, such as letters or the design rim, will inhibit expansion.  As a result, the die steel twists away from or flows around the stationary devices on the hub and toward the rim. Whenever a raised device from the hub lies in the path of the expansion, it will inhibit that expansion. The design rim too is raised and will also curtail expansion nearest the perimeter


Broken Hub

PART II. Die Varieties:

Broken Hub

Definition: A broken hub is any hub (master or working), that has either the whole or part of a design element broken away and missing from that hub.

This 1936P Lincoln cent was hubbed with a working hub that had the left leg of the R in LIBERTY missing. It was also hubbed with a normal working hub as well. Notice in the pictures above how the left leg on the R appears thinner than the other components of this letter. This particular working die also has a doubled die (1936P-1DO-003). Photographs by Chuck Daughtrey.

This is the same broken working hub that was used on the above working die. However, this time the working die was hubbed twice with the same broken hub. This coin was photographed and presented to this site by Ed Games.

Abrasion Doubling

Part X. Wastebasket/Composite Categories:

Doubling:

Abrasion Doubling (debunked)

Definition: Two types of abrasion doubling were defined by Alan Herbert, 1) inside abraded die doubling and, 2) outside abraded die doubling.

Inside abraded die doubling was alleged to be a type of intentional modification applied to a working die.  An abrasive was said to be used to restore and enlarge letters that had lost clarity due to die wear.  This form of abrasion doubling has been shown not to exist.  All purported examples of inside abraded die doubling are clearly cases of die deterioration doubling.

Outside abraded die doubling was said to be an occasional side effect of intentional die abrasion (“die polishing”, “stoning”, “lapping”).  Such a procedure is undertaken to remove light clash marks and other superficial damage.  The application of an abrasive was said to move metal around so as to create a secondary image.  This form of doubling has also proven to be a myth.  Most purported examples are simply cases of die deterioration doubling.  The most dramatic alleged case (shown below) also was determined to be the result of die wear.


This 1971 cent shows the development of secondary, incomplete letters and numbers.  A set of secondary letters is found above the RTY of LIBERTY.  An incomplete, secondary 9 and 7 are found above the middle two digits of the date.  The secondary elements have an irregular, beaded appearance.  Similar-appearing clusters of microscopic bumps appear elsewhere on the design.  Clusters and lines of bumps are shown here arranged along Lincoln’s mouth and above and below his beard.  Short, closely-spaced spikes extend from the back of Lincoln’s coat.  The bumps and spikes are all manifestations of die deterioration.

This cent has been classified by some as a doubled die.  Since doubled dies don’t display a beaded appearance, it’s highly unlikely that this diagnosis is correct.

  • « Previous Page
  • 1
  • 2
  • 3
  • 4
  • 5
  • Next Page »
  • Home
  • Introduction To This Website
  • Error-ref.com News
  • Comprehensive Error-Variety Checklist
  • Index Of Completed Entries
  • Part I. Die Subtypes:
  • Part II. Die Varieties:
  • Part III. Die Installation Errors:
  • Part IV. Die Errors:
  • Part V. Planchet Errors:
  • Part VI. Striking Errors:
  • Part VII. Post-Strike Mint Modifications:
  • Part VIII. Post-Strike Striking Chamber Mishaps:
  • Part IX. Post-Strike Mint Damage:
  • Part X. Wastebasket / Composite Categories:
  • Part XI. Non Errors:
  • Featured Articles Of Interested
  • Interest & Not So Interesting Facts
  • Other Sites And Forums Of Interest
  • Our Thanks Go To
  • About The Authors
  • Contact Us

Copyright © 2025